A FIREPLACE THAT'S LIT
- Mar 9, 2020
- 4 min read
Updated: Mar 23, 2020
A cost effective alternative to a full slab fireplace flanked by warm custom stained built-ins.

When we first started dreaming about building our home, I had a quite a list of things I knew we wanted: a warm white exterior, black windows, pale wood floors, to name a few. One of things I really struggled with was the fireplace. I was 100% certain I did not want a hearth, but I wasn’t sure on the finish.
I’d been saving pictures left and right of marble and quartz fireplaces, but have you ever priced out those bad boys? Holy smokes! The cost was laughable – truly! I laughed like a crazy person at the mere thought of spending tens of thousands of dollars on a fireplace, but I was admittedly a bit bummed.
How could I possibly get the sleek modern fireplace I longed for without breaking the bank?
To the Drawing Board
I started taking longer looks at my inspiration trying to determine exactly what I liked about them beyond the gorgeous slabs of marble and quartz. I loved the bright sleek whites against the dark fireplace. I loved the cleanness of the lines and the subtle gray veining that added movement to an otherwise streamlined surface. I loved the classic elegance that added to the rooms instead of crying for attention. I also noticed that I preferred fireplaces without a mantle. With all the cabinets, I figured a mantle would just break up the sleek look I was going for. My only question was where I was going to hang out stockings!


When it was time to start picking finishes, our builder’s lovely wife, Sheila, showed me some potential fireplace tiles and we set them next to the flooring sample we had already chosen. The winner winner chicken dinner had very subtle veining and a ton of white space.

This choice was perfect because I really wanted to achieve the illusion of an actual slab of quartz. For this reason and because our living room has 12 foot ceilings we decided to stack the tile vertically, one directly on top of the other as opposed to a standard brick lay, and use bright white grout that would blend with the bright white of the tile.
Taking Built-ins to New Heights
Once the tile was taken care of I had a bit of time until we needed to make decisions about the surrounding built ins. We had a few options:
1. Leave the spaces open and purchase matching hutches after moving in;
2. Install base cabinets with floating shelves above;
3. Build custom cabinets from floor to ceiling in both spaces
Here is the space in during the drywall phase including one with me and my sweet little newborn baby during her first visit to the house. This little baby is now almost a year old and I can't believe how far our family (and house!) has come since these photos!


Now option #1, purchasing hutches after moving in, was certainly tempting. Not only because I had seen this done in some model homes recently, but because I was constantly worried about our budget while building. I mean, if we could eliminate a big section of cabinets in the living room that would surely save us money, right? Sure, it might, until it came time to actually buy the hutches!

Option #2 seemed like the easiest option, but I was concerned that with the 12-foot ceilings, floating shelves would leave the spaces surrounding the fireplace a little bare. Now my real job is small business marketing, namely graphic design, so I have a lot of respect for white space. But not too much white space. So no, brah, we good.
Option #3 was the one I was really leaning towards, but 12 feet worth of cabinets seemed a little extra. Maybe A LOT extra. So, we sketched it out right on the fireplace drywall. 10-foot tall cabinets seemed substantial enough, but I really didn't want any open space above them. As we sketched and scratched out, and then sketched some more, we finally decided to build out 2 ft tall soffits that would be flush with the fireplace and surrounding walls from the top the cabinets to the top the ceilings accomplishing a truly built in finish. Real talk - I don't even know if soffits is the right term for what I'm describing but hopefully you get the picture!
To Paint or Not to Paint
For the longest time these built-ins were going to be white. The walls, trim and kitchen cabinets are all Sherwin Williams Pure White, so this seemed like an easy choice. It also seemed like a safe choice, but then I started noticing some of the light stained wood I was seeing online and in parade homes around Oklahoma City.


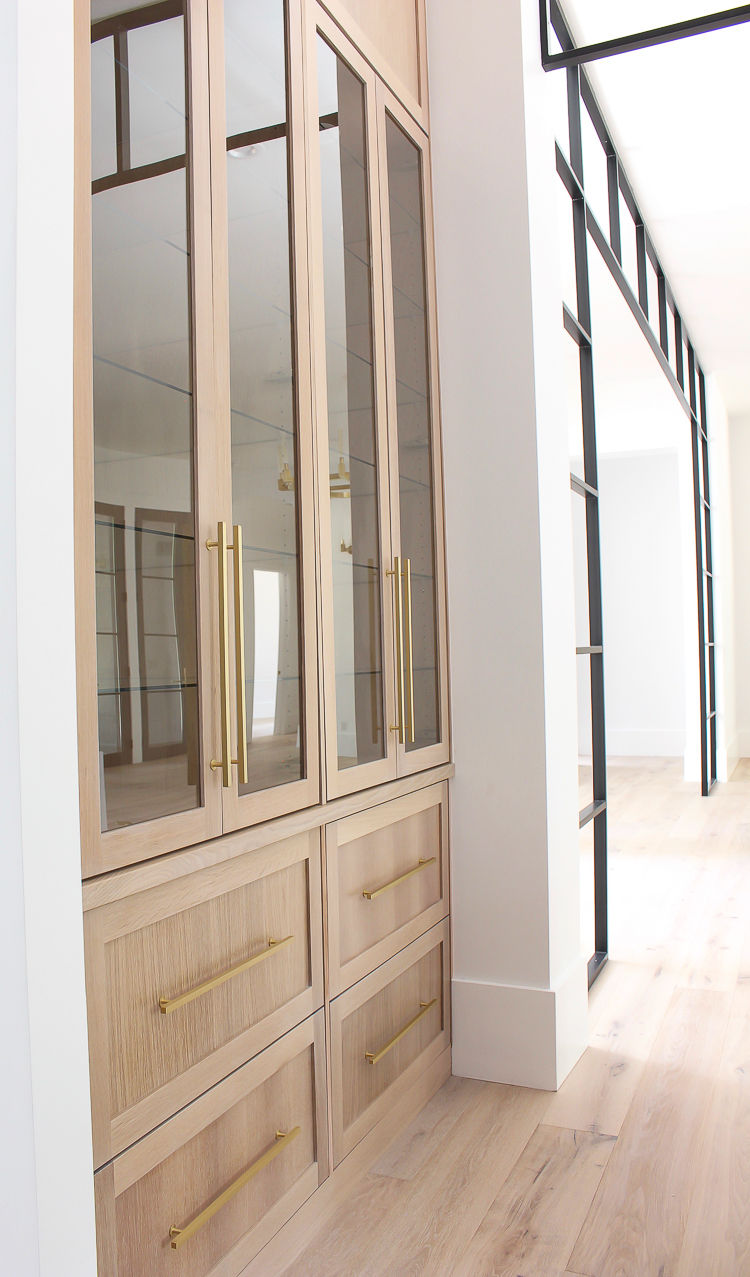
Then I stumbled across this photo and I was SOLD. Knock me over dead, THIS was the color I wanted our cabinets.

I sent this photo to Sheila and she enthusiastically agreed that this was the feel we needed to go for. She gave the painters the flooring sample and asked them to execute some stain samples that would match the flooring. We also decided to use the stain on all of the floating shelves in the pantry and media room, as well as on the cabinets in the laundry room and powder room to tie it all together in a new little white oak bow!
You may also notice that the beams also match, though that took a bit of trial and error since they are a different type of wood than the cabinets.


Next on the list for this room is new living room furniture, but that's a bit down the line on our priority list. Until then I'm enjoying focusing on the real showstopper here, our fireplace and built ins. How would you style your fireplace? Until next time!
All the Radness.
SHOP THIS POST


Comments